Quick 5-Minute Guide to User Management in Redmine
2025-09-11
•
Tags: 5-minute
•


This article will guide you through Redmine’s user management features—covering how to create new accounts, add and remove project members, and lock or unlock users.
Table of Contents
- Overview
- Creating a User
- Adding Members to a Project
- Removing Members from a Project
- Locking and Unlocking Users
Overview

Redmine is designed for collaborative use, allowing multiple people to work in the system simultaneously. Each person has their own account, which they use to log in. To access or work with project information, a user must first be added as a project member and assigned a role. When circumstances such as job transfers or resignations arise, you may need to restrict access to project data or block someone from logging into Redmine. This can be done by either removing the user from the project or locking their account. This guide walks through the essential steps for managing users effectively.
Creating a User
Only users with administrator privileges can create new accounts.
Right after installation, the admin account is given administrator rights, so it’s best to log in with admin to perform this task.
From the top menu, click Administration → Users to open the users list.

Users list
To create a new user, click "New user" on the right-hand side of the list. This will bring up the user creation form.

User creation screen
Fill in the required fields: Login(ID), First name, Last name, Email, and Password.
Redmine also offers the option to automatically generate a password. If you check both "Generate password" and "Send account information to the user," the system will create a password and send it to the user by email.
For security reasons, it is recommended to also check "Must change password at next logon." This ensures that after logging in with the emailed password, the user will immediately be prompted to set a new one. Once the password is updated, the one in the email can no longer be used.

Recommended options to use when creating an auto-generated password.
When all fields are completed, click "Create" to finish.
Adding Members to a Project
To allow a newly created user to access project information, you need to add them as a project member. A user can add members to a project if they meet either of the following conditions:
- They have system administrator privileges.
- They are already a member of the project and their assigned role includes the Manage members permission.
If you ran load the default configuration after installing Redmine, a role called Manager will have been created. This role already includes the "Manage members" permission, so it is a good option to use. To add a member to a project, open the top menu and click Projects, select the desired project, then click "Settings" in the project menu. Go to the Members tab to display the member list, and click "New member."

Click "New member"
The "New member" dialog will appear. In the Search for user or group field, select the user you want to add by checking the box next to their name. You can select more than one user at a time.
In the Roles section, check the boxes for the roles you want to assign. Multiple roles can be assigned to a single user. When you’re done, click "Add."

"New member" dialog
You will be taken back to the member list, where the newly added user will now appear.

The user has been added to the member list.
Removing Members from a Project
To remove a member from a project:
- Open the project’s Members tab.
- Locate the user you want to remove.
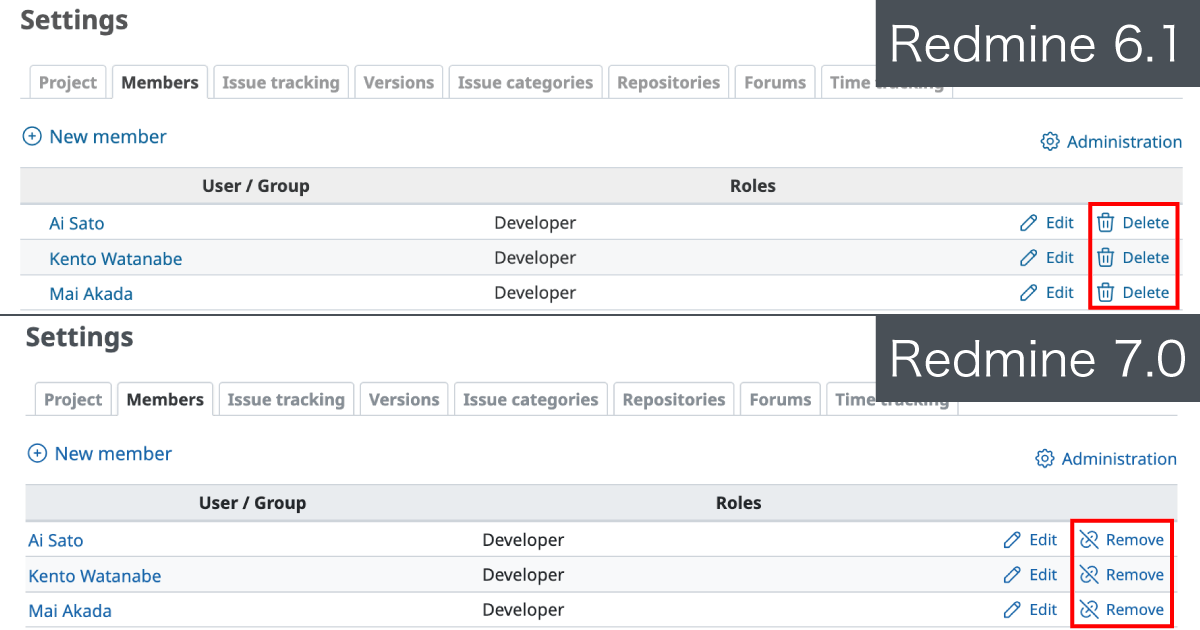
- Click "Delete."

Click "Delete" for the member you want to remove.
Locking and Unlocking Users
Sometimes you may need to prevent a user from logging in to Redmine, for example when an employee leaves the company. There are two ways to do this: delete the user or lock the user.
Deleting a user removes them completely from the Redmine system. However, once deleted, any records they created or updated will be reassigned to Anonymous, making it unclear who originally created or modified them. For this reason, unless there is a special circumstance, deletion is not recommended.
Locking a user disables their ability to log in while keeping their account in the system. This way, the user’s name remains associated with the issues and records they created or updated. In most cases, this is the preferred option.
To lock a user:
- Go to the top menu and click Administration → Users to open the user list.
- Find the user you want to lock, click the … menu at the right end of their row, and select Lock.

Lock a user
A locked user can be unlocked later if needed.
To unlock a user:
- In the user list, apply the filter Status → is → locked.
- Locate the account you want to unlock, click the … menu at the right end of their row, and select Unlock.

Unlock a user
Explore Redmine's capabilities firsthand on the demo site: demo.redminecloud.net
Return to the "Quick 5-Minute Guide to Redmine" Article List